NVE-CMS Help
NVE-CMS Setup
- Extract all files and folder from the nve-cms.zip file to your local computer.
- Create an empty Sql Server/MySql database on your web server.
- Open the db_conn.asp page in note pad or your web editor on your computer and
update the database connection strings
myServer, myDatabase, myUserID and myPassword and save the file. - Copy all nve-cms files and folders to the root direcory of your website with ftp.
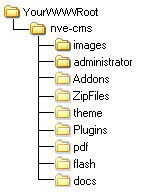
- Add Write Permissions to required folders listed.
- Go to http://www.yourdomain and the the database tables and default data will
be automatically created in the website database.
Folder that require read/write permissions
- images
- docs
- flash
- themes
- plugins
- addons
- zipfiles

Point your website to the nve-cms folder
Addon Tables and Data |
|
To add tables for your addon to the database put a create-tables.sql file in the main folder of your addon if the tables require default data to be inserted put a default-data.asp file in the main folder of your addon also
Create-tables.sql layout would should be as follows for each table your want to add.
When creating tables for your addon always prefix the table name with the addon name, So you dont accidentally run over an existing table.
IF NOT EXISTS (SELECT * FROM sys.objects WHERE object_id = OBJECT_ID(N'[dbo].[YourAddon_YourTableName]') AND type in (N'U'))
BEGIN CREATE TABLE [dbo].[YourAddon_YourTableName]( [ID] [int] IDENTITY(1,1) NOT NULL, [Somefield] [varchar](50) NULL, CONSTRAINT [PK_YourAddon_YourTableName] PRIMARY KEY CLUSTERED ( [ID] ASC )WITH (PAD_INDEX = OFF, IGNORE_DUP_KEY = OFF) ON [PRIMARY] ) ON [PRIMARY] END Do not include vbscript tags [ <% %> ] in the Create-Tables.sql file.
default-data.asp layout should be as follows
<% Set Conn = Server.CreateObject("ADODB.Connection") Conn.Open Application("ConnStr") Sql = "Insert Into YourTableName (FieldName) values('Field Values')" Conn.Close
Set Conn = Nothing %> Insert multiple records into a table example:
<%
Set Conn = Server.CreateObject("ADODB.Connection") Conn.Open Application("ConnStr") strData = "FieldOne;FieldTwo|FieldOne;FieldTwo|FieldOne;FieldTwo"
tmpArray = split(strData,"|")
for i = 0 to ubound(tmpArray)
tmpData = split(tmpArray(i),";")
Sql = "Insert Into YourTableName (FieldOne, FieldTwo) values('" & tmpData(0) & "','" & tmpData(1) & "' )"
Conn.Execute Sql
next
Conn.Close
Set Conn = Nothing %> After you upload your addon to the Addons folder of your website go to the website maintenance area.
Then click the Addons Activation button.
 If the Create-tables.sql file is found in your addon folder the Create Tables button will be included with your addon.
Just click the button and your create table script will be run and the default data will be inserted into the required table if the default-data.asp is found in the folder.
 After you have completed the table setup just check the yes radio button on your addon and click Update to activate your addon.
From this page you can activate or de-activate an addon at any time.
|
|
| Last Update:Thursday, June 25, 2015 | |
Plugins Tables and Data |
|
To add tables for your plugin to the database put a create-tables.sql file in the main folder of your addon if the tables require default data to be inserted put a default-data.asp file in the main folder of your addon also
Create-tables.sql layout would should be as follows for each table your want to add.
When creating tables for your addon always prefix the table name with the addon name, So you dont accidentally run over an existing table.
IF NOT EXISTS (SELECT * FROM sys.objects WHERE object_id = OBJECT_ID(N'[dbo].[YourPlugin_YourTableName]') AND type in (N'U'))
BEGIN CREATE TABLE [dbo].[YourPlugin_YourTableName]( [ID] [int] IDENTITY(1,1) NOT NULL, [Somefield] [varchar](50) NULL, CONSTRAINT [PK_YourPlugin_YourTableName] PRIMARY KEY CLUSTERED ( [ID] ASC )WITH (PAD_INDEX = OFF, IGNORE_DUP_KEY = OFF) ON [PRIMARY] ) ON [PRIMARY] END Do not include vbscript tags [ <% %> ] in the create-tables.sql file.
default-data.asp layout should be as follows
<% Set Conn = Server.CreateObject("ADODB.Connection") Conn.Open Application("ConnStr") Sql = "Insert Into YourTableName (FieldName) values('Field Values')" Conn.Close
Set Conn = Nothing %> Insert multiple records into a table example:
<%
Set Conn = Server.CreateObject("ADODB.Connection") Conn.Open Application("ConnStr") strData = "FieldOne;FieldTwo|FieldOne;FieldTwo|FieldOne;FieldTwo"
tmpArray = split(strData,"|")
for i = 0 to ubound(tmpArray)
tmpData = split(tmpArray(i),";")
Sql = "Insert Into YourTableName (FieldOne, FieldTwo) values('" & tmpData(0) & "','" & tmpData(1) & "' )"
Conn.Execute Sql
next
Conn.Close Set Conn = Nothing %> After you upload your plugin to the Plugins folder of your website go to the website maintenance area.
Then click the Plugins Activation button.
 If the Create-tables.sql file is found in your plugin folder the Create Tables button will be included with your plugin.
Just click the button and your create table script will be run and the default data will be inserted into the required table if the default-data.asp is found in the folder.
 After you have completed the table setup just check the yes radio button on your plugin and click Update to activate your plugin.
From this page you can activate or de-activate an plugins at any time.
|
|
| Last Update:Thursday, June 25, 2015 | |
